What Is Hot Stamping? A Quick Primer
Hot stamping — you’ll also hear it called foil stamping or hot foil stamping — is one of those printing techniques that feels almost magical the first time you see it up close. Heat a metal die, press it onto a roll of metallic or pigmented foil, and the design transfers onto the paper (or leather, plastic, or cloth) with a crisp, glossy impression that catches light at every angle.
Unlike conventional ink printing, which sits on the surface as a flat layer, hot stamping literally fuses a thin film of material onto your substrate. The result? A reflective, raised appearance that ink simply cannot replicate. Gold, silver, red, holographic — the foil choices have expanded dramatically over the last decade, and today there is a finish for nearly every aesthetic.
The technique has roots reaching back to the 19th century, when bookbinders first applied gold leaf to leather spines using heated tools. Modern hot stamping still follows the same basic principle — heat + pressure + foil — but the precision, speed, and creative range have evolved enormously. Today, packaging designers use it to signal luxury before a customer even opens the box. Book designers lean on it to make covers pop on a crowded shelf. Stationery brands use it to turn an ordinary business card into something people hesitate to throw away.
In the sections that follow, I will walk you through exactly how the process works, what color and foil options are available, which products benefit most from it, how it compares to metallic ink, and — crucially — what you need to know when preparing your artwork files for production.
The Hot Stamping Process: From Artwork to Finished Piece
A lot of people assume hot stamping is just “printing with shiny stuff.” In practice, it is a multi-step mechanical process that demands precise calibration of temperature, pressure, and dwell time. Here is how it unfolds in a professional print shop.
Step 1: Artwork Preparation and File Setup
Everything starts with the design file. The printer extracts the areas designated for foil and creates a dedicated mask or separation layer. Vector artwork is non-negotiable here — raster images with soft edges will not produce clean die lines. I have seen designers submit beautiful comps with drop shadows and gradients in the foil layer, and every time, the conversation ends the same way: “We need solid black-and-white vector art for the die.”
If you are preparing files yourself, keep line weights at 0.5 points or thicker, leave at least 0.5 mm of space between adjacent foil elements, and avoid type smaller than 6 pt for positive text (8 pt if reversed). More on this in the artwork preparation section later.
Step 2: Die Creation
Once the artwork is locked, it gets engraved onto a metal plate — the die. Most printers use brass or copper for long runs and fine detail, while magnesium may be chosen for short-run jobs where setup cost is the priority. Copper dies, typically 3–6 mm thick, hold detail beautifully and withstand thousands of impressions without losing edge definition.
The die is the single most critical piece of tooling in the entire process. A poorly etched die with burrs or uneven depth will produce inconsistent results no matter how carefully you dial in the press.
Step 3: Die Mounting and Alignment
The finished die is mounted onto a heated plate — sometimes called the honeycomb — on the stamping press. Alignment is checked against film positives or registration marks to ensure the foil impression lands exactly where intended, especially critical for projects where foil must register to printed artwork below it.
Experienced operators spend a good chunk of setup time on this step alone. Even a 0.5 mm misregistration is visible to the naked eye on a business card or book cover.
Step 4: Heating
The die is heated to a working temperature that varies depending on the foil series and substrate. The typical range spans roughly 95°C to 150°C (200°F to 300°F). Some specialized foils — particularly those formulated for coarse papers, bookbinding cloth, or leather — push closer to 150°C.
Temperature is not set-and-forget. Different foil colors within the same series can require different heat settings. Golds tend to be forgiving. Bright reds and holographics can be more temperamental. A good operator knows to start at the low end of the recommended range and dial up in small increments.
Step 5: The Impression (Dwell Time)
With the die at temperature and foil positioned between die and substrate, the press makes its move. The heated die descends, the release layer of the foil melts, the adhesive activates, and the pigmented or metallic layer bonds permanently to the surface. All of this happens in a fraction of a second — the dwell time might be anywhere from 0.1 to 1.0 seconds depending on the material.
Pressure matters enormously here. Too little, and the foil transfer is patchy or incomplete. Too much, and you get bruising on the reverse side of the sheet — especially noticeable on lighter paper stocks. On thicker materials like rigid boxes, you have more headroom to play with.
Step 6: Stripping and Finishing
As the die lifts, the polyester carrier film peels away, leaving only the design permanently fused to the substrate. The excess foil on the carrier roll is wound forward, and the finished piece is inspected. Any remaining foil flecks or edges are cleaned up. If embossing or debossing is part of the plan (which we will cover later), that may happen in a separate pass or simultaneously with a combination die.
At this stage, quality control checks for edge clarity, foil adhesion, and registration. A well-run stamping job delivers consistent results across an entire production run — which is why you want a printer who does volume, not someone who treats foil stamping as an occasional side service.
Color & Foil Options: More Than Just Gold and Silver
Ask someone to picture foil stamping, and they will almost certainly imagine gold. That association goes back centuries — and gold foil is still the single most popular choice by a wide margin. But the material science behind modern stamping foils has expanded the palette dramatically. Here is what is available today and when each type makes sense.
Metallic Foils
The workhorses of the foil world. Metallic foils use a vacuum-metalized aluminum layer to produce brilliant, reflective surfaces that mimic precious metals. Gold and silver are the staples, but copper, bronze, and rose gold have surged in popularity over the past few years — especially in beauty, spirit, and premium food packaging. A rose gold foil on a matte black box reads as unmistakably modern luxury.
Pigment Foils (Gloss & Matte)
Unlike metallic foils, pigment foils rely on opaque color layers rather than a reflective aluminum core. They deliver full-coverage, vibrant color — red, blue, green, black, white — without the metallic sheen. Gloss pigment foils look wet and polished. Matte pigment foils have a flat, non-reflective surface that works beautifully on uncoated paper stocks for a minimalist, modern aesthetic.
One underrated application: matte black foil on black paper. The subtle contrast of texture-on-texture gives a design huge sophistication without shouting.
Holographic Foils
Holographic foils are metallic foils embossed with a microscopic diffraction pattern that splits white light into a rainbow spectrum. The effect shifts as the viewing angle changes. There are patterned holographics — repeating stars, dots, geometric grids — and seamless holographics that produce a smooth color gradient across the surface.
These foils are everywhere in limited-edition packaging, collectible cards, and security printing. They also pair surprisingly well with minimalist designs: a small holographic logo on an otherwise sparse cover creates a focal point that is impossible to ignore.
Pearlescent & Semi-Transparent Foils
Pearl foils add a soft, iridescent shimmer that allows the underlying paper color to show through partially. They are the foil equivalent of a whisper rather than a shout — perfect for wedding stationery, high-end invitations, and projects where elegance matters more than impact.
Brushed & Textured Foils
Some foil series incorporate a directional brushed texture reminiscent of anodized aluminum or fine-grain metal surfaces. The three-dimensional quality adds depth without requiring embossing — which can save a production step if budget is tight.
Color Matching Reality Check
If you are coming from a CMYK print background, here is something you need to know: foils do not use a universal color standard. One manufacturer’s “gold” can look noticeably warmer or cooler than another’s. For brand-color-critical projects, always request a physical foil swatch book or stamped sample before committing to production. Digital mockups are useful for composition but misleading for color accuracy.
Where Hot Stamping Shines: Applications and Popular Products
Hot stamping shows up in more places than most people realize. Some categories have used it for decades. Others have only recently discovered it as a way to differentiate in crowded markets.
Book Covers, Spines, and Dust Jackets
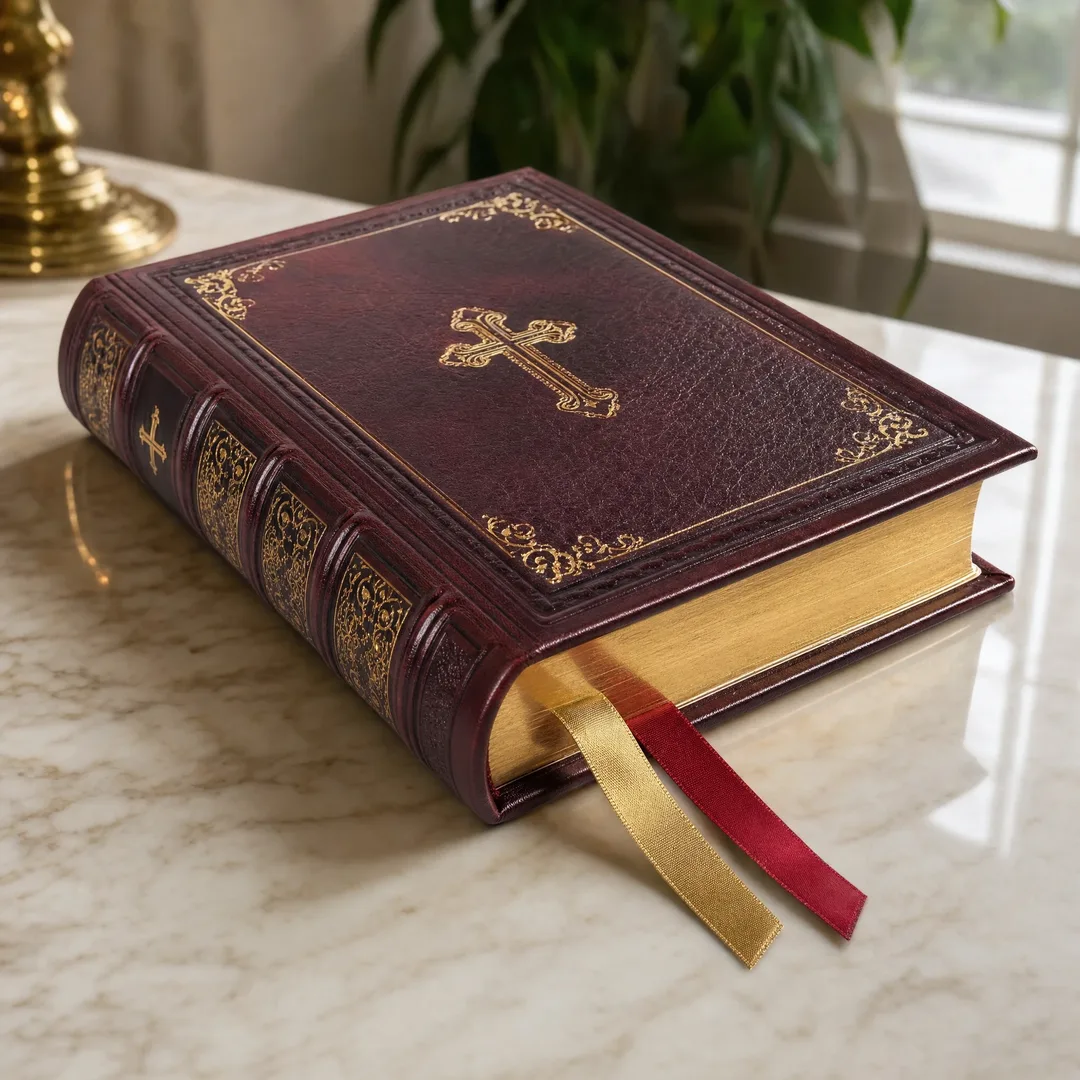
Book publishing is where hot stamping built its reputation. Cloth-bound hardcovers with gold-stamped spines have been a mark of quality since the 1800s, and the tradition is alive and well. Beyond the classic library look, modern publishers use foil stamping on dust jackets, slipcases, and even paperback covers to create shelf presence in retail environments where everything is fighting for attention.
A gold or silver title treatment on a photo-heavy cover can be the difference between a customer picking up your book or passing over it entirely. Children’s books, coffee table books, and special-edition releases are the heaviest users, but even trade paperbacks are increasingly incorporating foil elements.
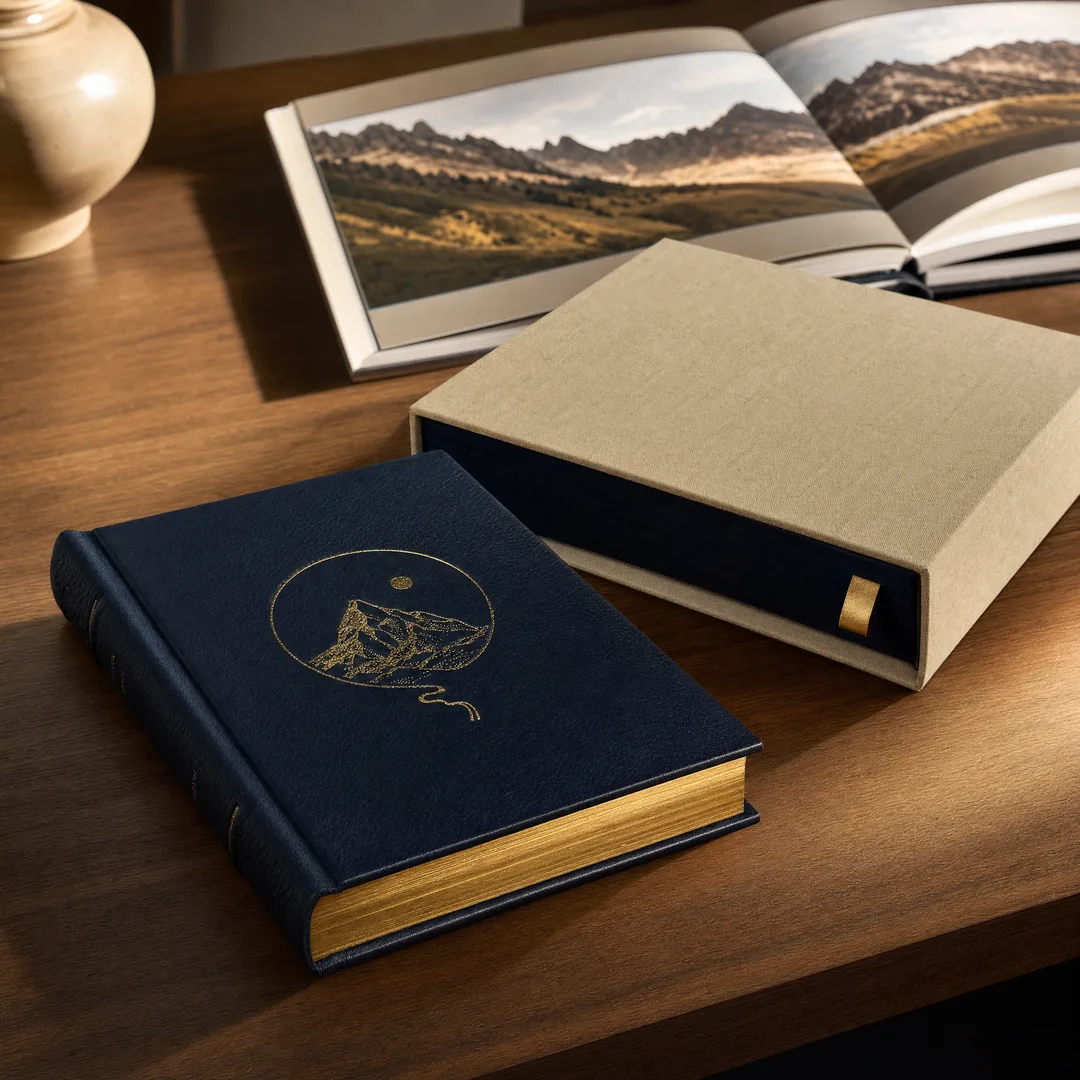
Notebooks and Journals
Walk into any stationery shop and you will see foil-stamped covers everywhere — leather-look journals with gold monograms, linen-covered notebooks with copper geometric patterns, minimalist bullet journals with a single metallic logo. The foil signals quality instantly, and it wears well over time.
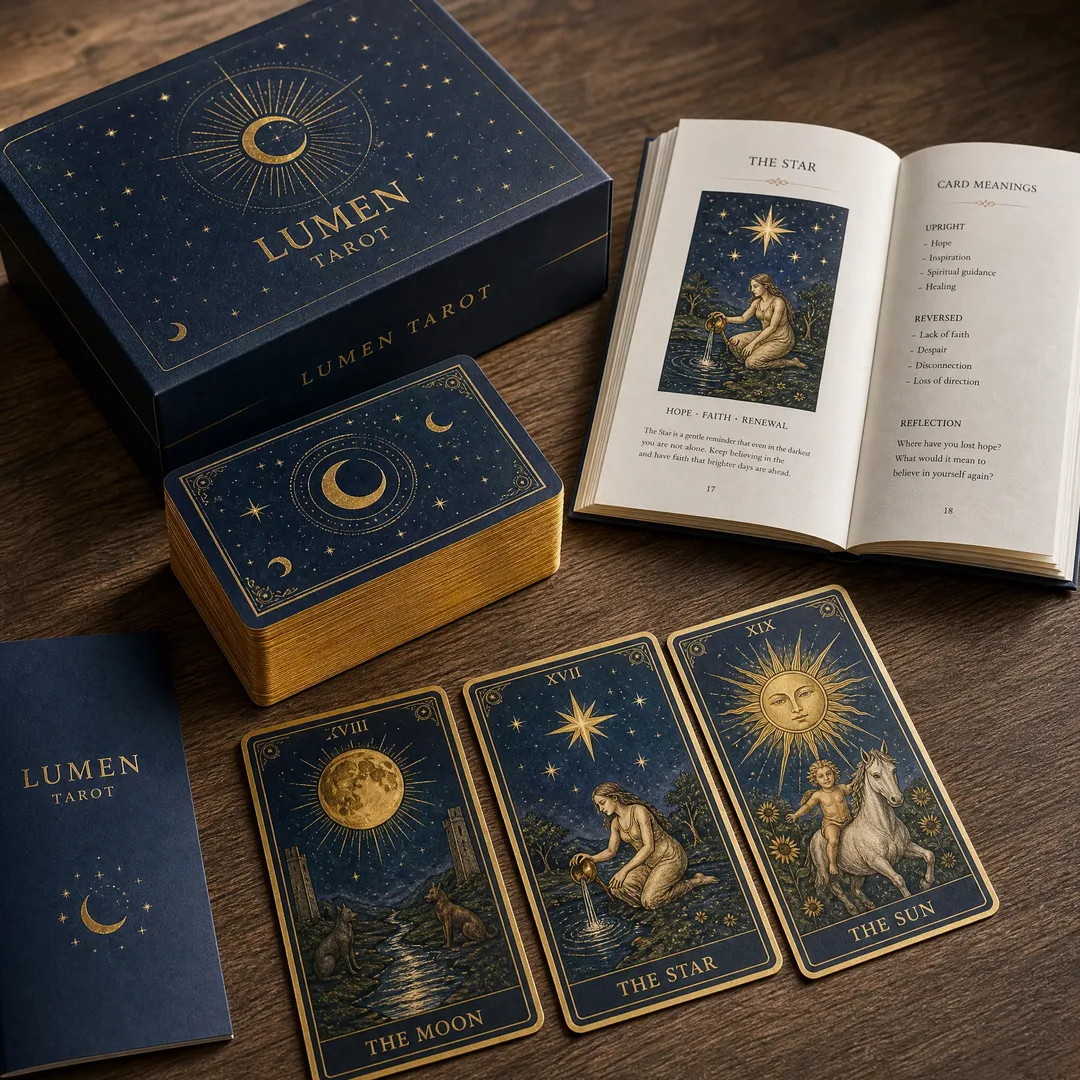
Cards: Business, Playing, Tarot, and Greeting
A business card printed with offset ink says “professional.” The same card with foil-stamped contact details says “I pay attention to details.” For playing cards and tarot decks, foil stamping on the tuck box is practically expected at the premium tier. Some manufacturers now offer foil-accented card faces as well, though this requires precision registration that not every printer can handle.
Packaging: Rigid Boxes, Folding Cartons, and Bags
This is the biggest growth area for hot stamping in the last decade. Cosmetics, spirits, chocolate, tech accessories — any product sold at a premium price point benefits from packaging that telegraphs quality before the customer sees the product inside. Rigid boxes (the kind Apple uses for iPhones) with foil logos and accents command higher perceived value, and consumers consistently rate foil-stamped packaging as more giftable than standard printed alternatives.
Even corrugated shipping boxes are getting the foil treatment for subscription and DTC brands that want the unboxing experience to start the moment the package arrives.
Labels, Stickers, and Hang Tags
Small-format but high-impact. A foil-stamped label on a wine bottle or a craft beer can communicates small-batch craftsmanship. Hang tags with metallic accents make apparel feel more premium on the rack. The cost per piece is low enough that even moderate-budget brands can justify it for seasonal or limited-edition releases.
Why Choose Hot Stamping? Six Benefits That Actually Matter
1. Perceived Value Goes Through the Roof
There is a reason luxury brands across every category use foil stamping: it works. Multiple consumer perception studies have shown that metallic finishes and raised textures increase willingness to pay. A foil-stamped package signals craftsmanship, care, and premium positioning before the customer reads a single word.
2. Durability That Outlasts Ink
Because the foil is fused — not just deposited — onto the surface, it resists scuffing, fading, and moisture far better than conventional printing. A foil-stamped book spine will look good after years on a shelf. A foil business card survives months in a wallet without degrading. That longevity is both a functional and brand-building advantage.
3. Eye-Catching at Any Distance
Metallic foil reflects ambient light in a way that flat ink cannot. On a retail shelf, at a trade show booth, or in a stack of mail on someone’s desk, foil-stamped items grab attention first. This is not a subtle effect — side-by-side tests consistently show foil outperforming standard print for initial visual engagement.
4. Versatility Across Materials
Paper, cardstock, coated stock, uncoated stock, leather, PU leather, bookbinding cloth, certain plastics, even some fabrics — hot stamping works on a remarkably wide range of surfaces. Different substrates require different foil formulations (a coarsely textured paper needs a foil with higher coverage and a different release profile than a smooth coated sheet), but the fundamental process adapts.
5. Unlimited Customization
With hundreds of foil colors, finishes, and patterns available — plus the ability to combine stamping with embossing, debossing, and spot UV — the creative possibilities are essentially unlimited. You can match brand colors, create tactile textures, build visual hierarchy, and develop a signature look that competitors cannot easily replicate.
6. Cost-Effective at Scale
The main cost in hot stamping is the die — a one-time tooling investment. Once the die exists, the per-piece cost drops significantly. For runs of 500 units or more, hot stamping becomes a cost-effective way to elevate perceived value without breaking the budget. Even shorter runs can make sense for high-margin products where the premium positioning justifies the upfront investment.
Hot Foil Stamping vs. Metallic Ink: A Practical Comparison
If you want a metallic look, you have two main paths: hot foil stamping or metallic ink printing. They produce very different results, and choosing between them comes down to what you value most — brilliance and texture, or speed and cost.
Here is a side-by-side breakdown:
Attribute
Hot Foil Stamping
Metallic Ink Printing
Appearance Highly reflective, true metallic sheen with a raised or debossed texture
Shimmer effect; flatter and less reflective than foil
Tactile Feel Raised or slightly indented — you can feel the design with your finger
Flat — no texture distinction from the surrounding print
Color Range Hundreds of foil colors and finishes, including holographic and pearl
Limited to metallic pigment blends; no true chrome or holographic effects
Durability Excellent — resists scuffing, fading, and moisture
Moderate — can rub off or oxidize over time, especially on uncoated stock
Fine Detail Excellent with copper dies — line weights down to 0.2 mm
Good, but metallic particles limit sharpness on very fine elements
Setup Cost Higher — requires a custom metal die
Lower — uses standard printing plates
Per-Unit Cost (at volume) Competitive — die cost amortized over the run
Lower for simple designs but less impactful
Best For Luxury branding, book covers, premium packaging, business cards where first impressions matter
Brochures, flyers, large-format where metallic accent is secondary
The short version: if you want your metallic elements to genuinely look like metal — to catch light from across the room and reward people who pick up the piece — hot stamping is the answer. If you need a subtle metallic shimmer at a lower cost and faster turnaround, metallic ink may be sufficient.
One more thing worth noting: these techniques are not mutually exclusive. A common high-end approach combines offset-printed metallic ink backgrounds with selective hot foil accents on top, creating depth and hierarchy that neither technique achieves alone.
Combining Foil Stamping with Embossing and Debossing
Hot stamping on its own produces a flat or very slightly debossed impression. But when you combine it with embossing or debossing, the result moves into three dimensions — and the tactile payoff is substantial.
Foil Stamping + Embossing (Combo Stamping)
In a combination stamping setup, the die is engineered to both transfer foil and raise the design above the paper surface. The paper fibers are physically reshaped during the impression, creating a dome-like relief that catches light and invites touch. This technique is especially common on book covers, certificate seals, and high-end packaging where the goal is to convey importance and permanence.
Combo stamping requires a mating set — a male die that pushes the paper upward and a female counter-die that supports the reverse side. The additional tooling cost is real, but the result is hard to match with any other single finishing process.
Foil Stamping + Debossing
Debossing presses the design into the paper rather than raising it. When combined with foil, the recessed area fills with metallic color while the surrounding surface remains untouched. The contrast between the indented foil and the flat paper surface creates a refined, understated effect that works particularly well on minimalist designs.
Debossed foil is also more durable in practical use: the design sits below the surface, protected from direct abrasion when items are stacked or handled.
Sequencing Matters
If you are combining foil with embossing or debossing, the production sequence affects the final result. Generally, it is better to emboss first and stamp foil second — the raised surface helps the foil adhere cleanly. But every project is different, and a good printer will run test pieces to confirm the optimal order before committing to the full run.
Also Worth Exploring: Foil + Spot UV
Foil stamping followed by a spot UV coating creates a glossy protective layer over the foil that adds depth and a wet-look finish. Many spirit and cosmetic brands use this combination to make their labels glisten under retail lighting. Just be aware that not all foils are compatible with UV coatings — the printer needs to verify adhesion before production.
Artwork Preparation: Getting Your Files Right the First Time
I cannot overstate how much time and money you save by preparing artwork correctly for foil stamping. Every printer I have talked to has stories about beautiful designs that had to be reworked — or worse, produced disappointing results — because the file was not set up for the process.
Vector Artwork Is Non-Negotiable
Foil stamping dies are created from solid, high-contrast vector paths. Raster images, photographs, gradients, and soft-edged effects do not translate into die engraving. If your foil design includes anything other than clean vector shapes, convert or simplify before submitting.
Create a Separate Foil Layer
The foil elements in your design should live on their own layer, clearly labeled — typically “Foil” or “Hot Stamp.” This layer should use 100% black (C:0 M:0 Y:0 K:100) for all areas that will receive foil. White areas on this layer will not be stamped. This separation lets the printer generate the die mask without ambiguity.
Minimum Specifications
Line weight: 0.5 pt minimum. Finer lines risk incomplete transfer or loss of edge definition.Positive text: 6 pt minimum. Smaller type may fill in or lose legibility.Reversed text: 8 pt minimum. Negative space needs more room to stay open during stamping.Spacing between elements: 0.5 mm minimum on smooth paper; wider on textured substrates.Bleed: Include at least 3 mm (1/8 inch) beyond the trim edge for foil elements that extend to the edge.
Font Choices Matter
Bold, clean sans-serif fonts and classic serif typefaces both foil-stamp well. Thin, delicate scripts and fonts with extreme stroke contrast are riskier — the fine strokes may not transfer consistently. If your brand typeface is on the delicate side, consider bumping up the weight or size specifically for foil elements.
File Format and Color Space
Submit your files as CMYK PDFs with the foil layer clearly identified. Include the full design (all layers) so the printer can see how the foil integrates with the rest of the artwork. If your design includes both CMYK printing and foil stamping, the combined file helps the printer verify registration.
The One Thing Most Designers Miss
Request a physical proof — not just a digital mockup. Foil color, reflectivity, and the interaction with your chosen paper stock are impossible to evaluate accurately on a screen. A stamped sample on the actual production stock takes a few extra days and adds a small cost, but it prevents expensive surprises. If the project budget allows, it is the single smartest investment you can make in the pre-production phase.
Material Selection & Frequently Asked Questions
Which Paper Stocks Work Best?
Smooth coated papers produce the cleanest, sharpest foil impressions. The flat surface allows the foil to bond evenly without gaps or edge blur. Uncoated and textured papers can also produce beautiful results — the foil takes on the texture of the paper beneath it, creating an organic, tactile quality — but the foil formulation needs to be matched to the stock’s absorbency and surface profile.
For paper weight, 250 gsm and above is recommended for single-sided foil stamping. Lighter stocks are possible but more prone to bruising on the reverse side, especially when higher pressure is needed for textured foils or embossing combinations.
Can You Foil Stamp on Dark Paper?
Absolutely. Metallic foils — especially gold, silver, and copper — are fully opaque and pop brilliantly on black, navy, or deep burgundy stocks. Pigment foils in lighter colors (white, pale pink, etc.) may require a double-pass or a foil with higher opacity to prevent the dark substrate from showing through. Always test on the actual stock.
Is Hot Stamping Environmentally Friendly?
The short answer is that it is getting better. Traditional foils use a polyester carrier film that is not widely recyclable, and the aluminum content is too thin to recover economically in standard recycling streams. However, the industry is moving in a more sustainable direction. Newer foil formulations are being designed for easier de-inking during paper recycling. Some manufacturers now offer low-halogen and bio-based carrier films. And because hot stamping applies material only where the design requires it — no ink overspray, no solvent emissions — the process starts from a relatively clean baseline.
If sustainability is a priority for your brand, ask your printer about eco-friendly foil options and recyclability compatibility with your chosen paper stock. Some combinations are easier to recycle than others.
How Much Does Hot Stamping Cost?
Cost depends primarily on three factors: die fabrication (a one-time charge), foil consumption (driven by the size of the stamped area), and press setup time (which is why per-unit cost drops at higher quantities). A simple single-color stamp on 500 business cards will cost more per card than the same stamp on 5,000 cards. For packaging runs of 1,000 units or more, hot stamping often adds 15–30% to the overall printing cost — a premium that the uplift in perceived value typically justifies many times over.
Can Multiple Foil Colors Be Applied on the Same Piece?
Yes, but each color requires a separate die and a separate pass through the press. Multi-color foil registration is precision work — the alignment tolerance between passes is tight, and the cost multiplies with each additional color. For most projects, a single foil color produces the strongest impact. If you need more complexity, consider combining one foil color with offset CMYK printing, embossing, or spot UV rather than adding a second foil pass.
What Is the Difference Between Hot Stamping and Cold Foil?
Cold foil uses UV-curable adhesive printed through standard offset plates, followed by a foil film that bonds to the adhesive under UV light. It is faster, requires no custom metal die, and can achieve a raised texture up to 0.8 mm. But it lacks the brilliance and sharpness of hot stamping, and the metallic finish is noticeably less vivid. Cold foil is a great option for high-volume runs where speed and cost efficiency matter more than absolute visual quality. Hot stamping remains the choice for premium applications where the metallic finish is a focal point of the design.
Is Hot Stamping Right for Your Project?
After walking through the process, the options, and the practical considerations, the question comes down to this: what feeling do you want your product or printed piece to create in the person who holds it?
If the answer involves words like premium, memorable, tactile, or distinctive — hot foil stamping probably belongs in your production plan. The technique has been refining itself for over a century, and in an era when so much communication has moved to screens, a physical piece with a genuinely luxurious finish stands out more than ever.
That said, hot stamping is not the right answer for every project. If your budget is tight and the metallic element is secondary, metallic ink or cold foil may serve the purpose. If your design is highly complex with fine photographic detail, foil stamping alone will not carry it — you will want offset printing with selective foil accents. The smartest approach is to talk through your specific project with a printer who does foil stamping at volume and can give you an honest assessment of what works and what does not.
We work with hot foil stamping every day — on book covers, packaging, cards, labels, and custom projects that push the boundaries of what the technique can achieve. If you want to see how a specific design translates into foil, or if you just want to get a feel for the different foil colors and finishes in person, we are happy to send you a free sample kit.
Contact EcoPrinting for a Free Sample — no commitment, just a chance to see what the process can do for your project.